Sunday, 16 November 2014

Sitecore API

The Sitecore API is very powerful; you are able to query Sitecore items using a number of different technologies, from standard .NET web forms to using XSLT and MVC. Sitecore items can also be queried using a number of methods; they have their own query languages Sitecore Query and Sitecore Fast Query which are very similar to XPath, and you are also able to use Linq to query Sitecore items and use ‘where’ clauses to filter down further.

To access any Sitecore item you can use the Sitecore.Data.Items.Item. Sitecore provides specialized classes to represent specific types as items, such as Sitecore.Data.Items.TemplateItem to represent a data template and Sitecore.Data.Items.MediaItem to represent a media item.

GetItem: The Sitecore.Data.Database.GetItem() method use to retrieve a Sitecore.Data.Item.Item. which take the ID of the item or the path to the item as the first parameter to the Sitecore.Data.Database.GetItem()

Sitecore.Data.Database master = Sitecore.Configuration.Factory.GetDatabase("master"); Sitecore.Data.Items.Item home = master.GetItem("/sitecore/content/home");
Sitecore.Data.Items.Item mediaRoot = master.GetItem(Sitecore.ItemIDs.MediaLibraryRoot);
Sitecore.Data.Items.TemplateItem standard = master.Templates[Sitecore.TemplateIDs.StandardTemplate];

Editing the item: Place an Item in Editing Mode before edit using Sitecore API
Sitecore.Data.Database master = Sitecore.Configuration.Factory.GetDatabase("master"); Sitecore.Data.Items.Item home = master.GetItem("/sitecore/content/home"); 

using (new Sitecore.SecurityModel.SecurityDisabler()) 
{ 
home.Editing.BeginEdit(); 
try { 
//TODO: update home 
home.Editing.EndEdit(); 
} 
catch (Exception ex) 
{ 
home.Editing.CancelEdit(); 
}

If we do call the Sitecore.Data.Items.Item.Editing.CancelEdit() method or do not call the Sitecore.Data.Items.Item.Editing.EndEdit() method, Sitecore does not commit the changes.

Get Children of an Item: Use the Sitecore.Data.Items.Children property to access the children of an item. For example, to access the children of the /Sitecore/Content/Home item in the Master database: Sitecore.Data.Database master = Sitecore.Configuration.Factory.GetDatabase("master"); Sitecore.Data.Items.Item home = master.GetItem("/sitecore/content/home"); foreach(Sitecore.Data.Items.Item child in home.Children) 
{
 //TODO: process child
}

Get Descendant of that item: Using a recursive method we can access descendant of the items.
Sitecore.Data.Database master = Sitecore.Configuration.Factory.GetDatabase("master"); Sitecore.Data.Items.Item home = master.GetItem("/sitecore/content/home"); ProcessRecursively(home); 
... 
private void ProcessRecursively(Sitecore.Data.Items.Item item) 
{
//TODO: process item 
foreach(Sitecore.Data.Items.Item child in item.Children) 
{ 
     ProcessRecursively(child);
}
}

Get Parent of an Item: You can use the Sitecore.Data.Items.Item.Parent property to access the parent of an item.
Sitecore.Data.Items.Item parent = home.Parent;

Get Ancestors of an Item: Can use the Sitecore.Data.Items.Item.Parent property in a recursive method to access the ancestors of an item.
ProcessRecursively(home.Parent); 
... 
private void ProcessRecursively(Sitecore.Data.Items.Item item) 
{ 
//TODO: process item 
if (item.Parent != null ) 
{ 
   ProcessRecursively(item.Parent);
} 
}

Sitecore Query: Can use the Sitecore.Data.Database.SelectItems() method to retrieve items in a database that match a Sitecore query.
Sitecore.Data.Database master = Sitecore.Configuration.Factory.GetDatabase("master"); 
string query = String.Format("//*[@@templateid='{0}']", Sitecore.TemplateIDs.Folder); Sitecore.Data.Items.Item[] queried = master.SelectItems(query);

Other Operations: 

Rename an Item :
Sitecore.Data.Items.Item sample = master.GetItem("/sitecore/content/home/sample"); sample.Editing.BeginEdit(); 
sample.Name = "Changed"; 
sample.Editing.EndEdit();

Move an Item :
Sitecore.Data.Items.Item sample = master.GetItem("/sitecore/content/home/sample"); Sitecore.Data.Items.Item content = master.GetItem(Sitecore.ItemIDs.ContentRoot); sample.MoveTo(content);

Copy an Item :
Sitecore.Data.Items.Item home = master.GetItem("/sitecore/content/home"); 
Sitecore.Data.Items.Item content = master.GetItem(Sitecore.ItemIDs.ContentRoot); home.CopyTo(content,"Sibling");

Delete an Item :
Sitecore.Data.Items.Item sample = master.GetItem("/sitecore/content/home/sample"); sample.Delete();
Delete the Descendants of an Item :
You can use the Sitecore.Data.Items.Item.DeleteChildren() method to delete the descendants of an item.


Sitecore Web Service

The Sitecore service layer is based on web services. It is useful when the developer wants to use Sitecore as a repository for his site content.

Sitecore provides two sets of web services:

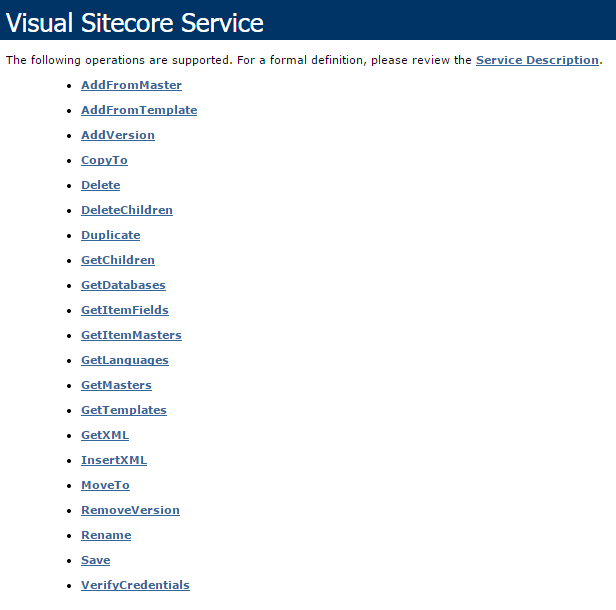
  • Visual Sitecore Service (Good Old Web Service) at /sitecore/shell/WebService/service.asmx
  • Sitecore Web Service 2 (Hard Rock Web Service) at /sitecore/shell/WebService/service2.asmx


Some of the methods purposes are:

Method Name
Purpose
AddFromMaster
To create and item under master item.
AddFromTemplate
To create and item of specified template type.
AddVersion
To create new version of item.
CopyTo
To create copy of existing item.
Delete
To delete and item.
DeleteChildren
To delete children of the specified item.
GetChildren
To retrieve children of item.
GetDatabases
To return list of the database names .
GetItemFields
To returns a list of the fields that this item contains.
GetItemMasters
To return master of the item
GetLanguages
To returns a list of the languages that are set for the entire site.
GetTemplates
To returns a list of the templates in the site.
GetXML
To returns the XML representation of an item.
MoveTo
To move the item under different parent
Rename
To Rename an item
InsertXML
To insert item based on representation
Save
To updates the item based on the representation
VerifyCredentials
To validate user authorization.

Sitecore Databases

Sitecore is 100% Microsoft based, SQL Server, .NET Framework 3.5, and IIS is supported. Sitecore data is stored in multiple databases and itself is made up of three databases and a web application. Sitecore has three default databases and they are core, master and web.

Databases serve following purpose:

Core database :

The core database is used by Sitecore to manage membership, handle system settings and hold the entire configuration for all applications in the CMS. This database can be accessed through the CMS, and you are able to configure any of the settings, override standard functionality, build your own applications, and add buttons and functionality to the ribbon in the editors. The managed website that provides the Sitecore user interfaces accesses the core database and allows the user to view and edit content in the master database by default.

Master database :

The Master database is the authoring database - it contains all versions of any content or assets. CMS user interfaces access the master database by default. The master database is where all the content editor work is done. Whenever a new piece of content is created, edited or deleted it is stored here, including those in preview mode. The master database can have workflow enabled and customized, so sections of the site can be locked down to certain roles, or made to go through an approver or translator before they go live.


Web database :

The web database is the default publishing target database: by default, Sitecore publishes changes from the master database to the web database. It differs from the master database in that it doesn’t contain anything in preview mode and only stores the latest live version of each item. When a content editor publishes some content it is then copied from the master database to the web database.


Access and context:

Databases can be accessed through the Database class. 
To get a reference to a database, use the Factory class

Sitecore.Data.Database master =   Sitecore.Configuration.Factory.GetDatabase("master");

Whenever the user code is invoked by Sitecore, a so called context database is automatically assigned. You can access this database by using the Context class:

  Sitecore.Data.Database current = Sitecore.Context.Database;

A Sitecore database contains data elements called items. Programmatically, the data represented by Items is accessed through the class Item.

  To get an Item from the current context database, you can use

  string itemPath = "/sitecore/content/home"; 
  Sitecore.Data.Items.Item item = Sitecore.Context.Database.Items[itemPath];

The itemPath is the path of Item names leading to a specific Item.
Items can be retrieved using paths or IDs. Languages and versions can also be specified

  Sitecore.Data.ID itemID = Sitecore.Data.ID.Parse( 
    "{110D559F-DEA5-42EA-9C1C-8A5DF7E70EF9}"); 

  Sitecore.Globalization.Language language =  
    Sitecore.Globalization.Language.Predefined.English;
  Sitecore.Data.Version version = Sitecore.Data.Version.Parse(1);  
  Sitecore.Data.Items.Item homeitemlanguage =  
    Sitecore.Context.Database.Items[itemID, language, version];

The data within an Item is organized in named fields. For instance, an Item to be displayed on a web site may contain a title and some text. To access the values of these fields, you can use an indexer on an Item

Sitecore.Data.Items.Item homeitem = Sitecore.Context.Database.Items["/sitecore/content/home"];
string title = item["title"];
string text = item["text"]; 

Sitecore Content Tree

Content Tree:


The Content Tree allows viewing the Sitecore system as a tree with child items grouped under their parents. The Content Tree Structure is displayed by default and contains the hierarchy of folders and content records comprising the site. All the content contained in a Sitecore web application is stored in the content tree, with the Content and Media Library items intended for content editors’ use and the Layouts, System and Templates folders aimed at developers and system administrators. Sitecore considers everything within the content tree an item that can be queried using the API; so all pages are items, as are images, PDFs and so on, meaning they can be easily found using this method.


Top items folders in content tree are:

Content :

The Content item folder is where the pages and data for the website are stored, and the structure of these items represents the structure of the website.

Media Library:

The Media Library, accessed with the Media Browser, is used to manage media files (images, PDFs, documents, audio, video, and multimedia) are stored in the Media Library.

Layout :

The Layout item folder is where all the ‘layouts’ for the web application are declared, referencing the location of the file in the web application root. It also contains ‘sublayouts’; partial files that represent the widgets etc. used to create a page. Layouts are combined with multiple sublayouts to build pages, which means widgets can be reused and content editors can swap out one widget for another without developer intervention.

System :

The System item folder is where standard settings for the content editor and the web application are held. For example, if you wanted to add another language to the web application this is where you would do it.

Templates :

The Templates item folder is a where all the template items are stored for the site. Template items are used to describe objects in Sitecore, and specify what fields that object will contain, the content of any standard values and any layouts that are attached to the item

Sitecore Overview


Sitecore is a one of the leading enterprise-level .NET web content management software. Sitecore gives mid to large size organizations a comprehensive tool with the ability to build, deploy and securely manage business solutions such as web applications, public websites which require CMS (Content Management System) functionality, integration options and scalability.

CMS is a web application designed to make it easy for non-technical users to add, edit and manage a website contents. Some of important features of a CMS like Web-based publishing, format management, revision control, indexing, search, and retrieval.

KEY FEATURES & BENEFITS

Sitecore architecture: Sitecore architecture is nice plug-gable and scalable component based architecture that can essentially be selected, assembled and syndicated across multiple sites. It is written in .Net.

Simple and powerful interface: Sitecore has a powerful and simple end-user interface for content manager as well as for developer. User will feel familiar with interface if he/she has used MS office earlier.

Cutting Edge Technology: Sitecore is completely built on Microsoft .NET technologies, so sites built with Sitecore integration will run in any browser and on any browser-based device. The Sitecore user interface works in Internet Explorer, Mozilla, Firefox and Mac browser, to mobile devices such as iPhone, Android, and Windows Phones,. Dynamic delivery, intelligent caching and ASP .Net delivers pages very quickly. The product is compliant with the Worldwide Consortiums open Internet standards, for example SOAP (Web services), XML and uses the extensible application markup language (XAML) concept.

External Data Integration: Sitecore CMS provides a full data integration and abstraction layer ( Sitecore Data Providers/Importer) that will allow you to connect to any database, Web service or other external systems and access that content.

Improved Search Engine Optimization: Sitecore created the SEO module to improve sites search engine ranking through that not only helps increase Google ranking, but also improve the search experience for visitors of website.

Easily Integrate with Third Party Tools: Sitecore seamlessly integrates with third party tools such as SharePoint, various ERP and CRM systems, Clay Tablet, Google Analytics and many more modules.

Deliver personalized content based on user behavior: Content personalization through Sitecore gives your marketing team the ability to own your customer experience in a much tailored method.

Content management workflow: Sitecore's workflow engine includes versioning, controlled approvals, incremental publishing, notifications and reminders, and archiving capabilities. The document comparison feature allows enhanced version control content, allowing editors and approvers to see exactly what has changed. This feature is also useful when managing content translation processes, highlighting exactly what content has changed and needs to be translated from its source language. Having strong workflow processes ensure your content is the highest quality it can be, and your site delivers the most compelling user experience it can.

Multi-language content support: As more companies expand their reach globally, Sitecore allows editors to work with the CMS in their native languages and provide multi-lingual capabilities based on diverse user audiences. Sitecore also lets you to coordinate the management of the many language versions of your website, as well as the translation processes as content changes.

Rapid Development: Sitecore lets you use the tools you want to use and provides unparalleled support for .NET developers. You can work directly in Sitecore or use external tools such as Microsoft Visual Studio.

Searching: Sitecore exposed search API for CMS item searching. Developer can also easily integrate open source search technology Lucene with CMS. sitecore also provide fast query syntax for faster search.

Security: Sitecore offers an incredible level of security, enabling you to manage content down to their component and element levels. It also provides a sophisticated permission management system to grant rights to users, groups and roles. Sitecore also supports external authentication and authorization systems, and was engineered to plug into existing systems such as CRM solutions to power visitor authentication as well as easily integrating into Active Directory for user management.

Monday, 4 March 2013

ASP.NET MVC Unobtrusive Ajax


Unobtrusive Ajax: 
The MVC Framework contains support for unobtrusive Ajax like Ajax link and Ajax form. To enabled unobtrusive Ajax below js file should be include in view.

<script src="@Url.Content("~/Scripts/jquery.unobtrusive-ajax.js")" type="text/javascript"></script>

Ajax Form: To create an Ajax-enabled form we have to define following in view.


  • Ajax Options
  • Ajax Begin Form

      Ajax options: The AjaxOptions class has a set of properties that let us configure how the asynchronous request to the server is made and what happens to the data that we get back.

Property
Description
Confirm
Displays a confirmation message before making the Ajax request
HttpMethod
Use to set the HTTP method to make the request like Get or Post.
InsertionMode
Option to set Ajax response content in HTM. Optins are “InsertAfter”, “InsertBefore”, and “Replace” (the default)
LoadingElementId
Specifies the ID of an HTML element that will be displayed while the Ajax request is being performed.
LoadingElementDuration
Specifies the number of milliseconds to LoadingElement will appear while Ajax calls.
UpdateTargetId
Sets the ID of the HTML element into which the content retrieved from the server will be inserted.
Url
URL that will be requested from the server.

When using the Ajax.BeginForm helper method, we passed the name of the action method that the asynchronous request should be made to and the AjaxOptions object that configures the request.

Example:
@model IEnumerable<MVCValidation.Models.RegisterModel>
@{
    ViewBag.Title = "Users";
    AjaxOptions ajaxOpts = new AjaxOptions
    {
        UpdateTargetId = "result",
        Url = Url.Action("SearchedUsers"),
        LoadingElementId = "loading",
        LoadingElementDuration = 3000,
        Confirm = "Are you sure to request new data?",
        InsertionMode = InsertionMode.InsertBefore
    };
}

@using (Ajax.BeginForm("SearchedUsers", ajaxOpts)) {
<p>
@Html.DropDownList("userName", new SelectList(
            new[] { "All", "User1", "User2", "User3" }, "All"))
<input type="submit" value = "Submit" />
</p>
}

<div id="loading" style="display:none; color:Red; font-weight: bold">
<p>Please wait...</p>
</div>

<div id="result">
</div>

public PartialViewResult SearchedUsers(string userName)
{
     List<RegisterModel> users = UserHelper.GetUsers();
     users = users.FindAll(c => c.UserName == userName);
     return PartialView("SearchedUsers",users);
}

Ajax Links: Ajax helper method ActionLink use to asynchronously request when user clicks on link.

Example:

AjaxOptions ajaxOpts = new AjaxOptions
    {
        UpdateTargetId = "userResult",
        LoadingElementId = "loading",
    };

<div id="userResult">
</div>


@Ajax.ActionLink("Details", "UserDetails", new { @userName = Model.UserName }, ajaxOpts)

public ContentResult UserDetails(string userName)
{
     RegisterModel user = UserHelper.GetUsers().Find(c => c.UserName == userName);
     StringBuilder sb = new StringBuilder();
     sb.Append("User Detail: ");
     sb.Append("UserName: " + user.UserName);
     sb.Append(" Email: " +  user.Email);

     return Content(sb.ToString());
}


Ajax Callbacks: The AjaxOptions class defines a set of properties that allow us to specify JavaScript functions that will be called at various points in the Ajax request life cycle.

Property
jQuery Events
Description
OnBegin
beforeSend
Called prior to the request being sent
OnComplete
complete
Called if the request is successful
OnFailure
error
Called if the request fails
OnSuccess
success
Called when the request has completed, irrespective of whether the request succeeded or failed.


Ajax callbacks properties takes name of JavaScript functions which executes while Ajax  request cycle.

Example:

AjaxOptions ajaxOpts = new AjaxOptions
    {
        UpdateTargetId = "result",
        OnBegin = "OnBegin",
        OnFailure = "OnFailure",
        OnSuccess = "OnSuccess",
        OnComplete = "OnComplete"
    };

<script type="text/javascript">
    function OnBegin() {
        alert("This is the OnBegin Callback");
    }
    function OnSuccess(data) {
        alert("This is OnSuccess Callback: " + data);
    }
    function OnFailure(request, error) {
        alert("This is OnFailure Callback:" + error);
    }
    function OnComplete(request, status) {
        alert("This is  OnComplete Callback: " + status);
    }
</script>

ASP.NET MVC Model Validation


Model Validation: 
Validations are required for ensuring that the received data is valid and correct so that we can do the further processing with the data.

Validate in action method: We can validate model in action method. We can check the values of properties of the model object and register any errors we find with the ModelState property.
We can check to see whether the model binder was able to assign a value to a property by using the ModelState.IsValidField method. We do this make sure that the model binder was able to parse the value the user submitted; so that can perform additional checks.

Example:

if (string.IsNullOrEmpty(model.UserName))
{
      ModelState.AddModelError("UserName", "Please enter your user name");
}

if (!model.TermsAccepted)
{
      ModelState.AddModelError("TermsAccepted", "You must accept the terms");
}

if (ModelState.IsValid)
{
      //send model for further processing
}

ValidationSummary: The validation summary displays the error messages that we registered with the ModelState in our action method. There are a number of overloaded versions of the ValidationSummary method.

Method
Description
Html.ValidationSummary()
Generates a summary for all validation errors.
Html.ValidationSummary(bool)
If the bool parameter is true, then only model-level errors are displayed. If the parameter is
false, then all errors are shown.
Html.ValidationSummary(string)
Displays a message before a summary of all the validation errors.
Html.ValidationSummary(bool,string)
Displays a message before the validation errors. If the bool parameter is true, only model-level errors will be shown.


ValidationMessage: The Html.ValidationMessageFor helper displays validation errors for a single model property.
@Html.ValidationMessageFor(m => m.UserName)

Validation in the Model Binder: The default model binder performs validation as part of the binding process. The model binder performs some basic validation for each of the properties in the model object. If value has not been supplied or value that cannot be parsed into the model property type. DefaultModelBinder, provides us with some useful methods that we can override to add validation to a binder. Find detail in below table.

Method Name
Description
Default Implementation
OnModelUpdated
Called when the binder has tried to assign values to all of the properties in the model object. Model level validation.
Applies the validation rules defined by the model metadata and registers any errors with ModelState.
SetProperty
Called when the binder wants to apply a value to a specific property. Property level validation
Required or not valid message will show.


Data Annotations: The MVC Framework supports the use of metadata to express model validation rules. We can easily add validation to our application by including Data Annotations namespace and use attributes to our model classes. Data Annotations allow us to describe the rules we want applied to our model properties, and ASP.NET MVC will take care of enforcing them and displaying appropriate messages to our users. There is number of attribute classes which inherits validation attribute class, use to manage different types of validation.

Some of important build in data annotation attributes are:

  • Required – Indicates that the property is a required field
  • DisplayName – Defines the text we want used on form fields and validation messages
  • StringLength – Defines a maximum length for a string field
  • Range – Gives a maximum and minimum value for a numeric field
  • RegularExpression – Validate input value as per defined regular expression
  • Compare – Two property must have same value.


Custom validation class: We can also create custom validation attribute by deriving from the ValidationAttribute class and implementing our own validation logic. We can override the IsValid method of the base class, this method get called by binder while passing value provided by user as the parameter.

Example:
public class MustBeTrueAttribute : ValidationAttribute
    {
        public override bool IsValid(object value)
        {
            return value is bool && (bool)value;
        }
    }

[Display(Name = "I accept the terms & conditions")]
[MustBeTrue(ErrorMessage = "You must accept the terms")]
public bool TermsAccepted { get; set; }


Model Validation Attribute: We can also create a custom attribute at model level instead of property level. Model validator attribute will use only if property-level attributes does not register a validation error. We must apply a model validation attribute to the model class itself.

Example:
public class RegisterValidatorAttribute : ValidationAttribute
    {
        public RegisterValidatorAttribute()
        {
            ErrorMessage = "Please enter valid email";
        }

        public override bool IsValid(object value)
        {
            RegisterModel model = value as  RegisterModel;

            if (model.Email.Contains("test") || model.Email.Contains("test.com"))
            {
                return false;
            }
            return true;
        }
    }

[RegisterValidator]
public class RegisterModel


Client-Side Validation: In web application user expect immediately validation, without having to submit data to the server. This is client site validation and usually we implement JavaScript for this. This allow user to correct data before sending to the server for further processing.
The MVC Framework supports unobtrusive client-side validation. The term unobtrusive means that validation rules are expressed using attributes added to the HTML elements that we generate. These are interpreted by a JavaScript library that is included as part of the MVC Framework, which uses the attribute values to configure the jQuery Validation library, which does the actual validation work. There are few advantages using this approach.


  • We do not have to include client-side validation logic into our views
  • If JavaScript disabled in browser then server side validation will fire in same manner.
  • Mitigate the effect of browser inconsistencies and behaviors.


Enable/Disable Client validation: Developer can enable and disable client side validation by setting in web.config. By default it’s enabled.

<appSettings>
    <add key="ClientValidationEnabled" value="true"/>
    <add key="UnobtrusiveJavaScriptEnabled" value="true"/>
 </appSettings>

Both of these settings must be true for client-side validation to work. We can also set value programmatically like in global.asax page application start method.

protected void Application_Start()
{
HtmlHelper.ClientValidationEnabled = true;
HtmlHelper.UnobtrusiveJavaScriptEnabled = true;
}

We can enable or disable client-side validation for individual views as well by setting above value in view page.

In addition to the configuration settings, we must references three specific JavaScript libraries.

<script src="@Url.Content("~/Scripts/jquery-1.5.1.min.js")" type="text/javascript"></script>
<script src="@Url.Content("~/Scripts/jquery.validate.min.js")" type="text/javascript"></script>
<script src="@Url.Content("~/Scripts/jquery.validate.unobtrusive.min.js")" type="text/javascript"></script>

After all above setting client side validation will start to work based on applied metadata attributes in model properties such as Required, Range, Regular Expression and String Length.
Client side validation works faster and also perform validation on key stroke like key press or focus change.

In MVC Framework validation rules are expressed using HTML attributes. MVC client-side validation is that the same attributes we use to specify validation rules are applied at the client and at the server.  

Example:
Without validation attribute:
public string UserName { get; set; }
Output:
<input id="UserName" name="UserName" value="" type="text">

With validation attribute:
[Required]
public string UserName { get; set;
Output:
<input id="UserName" name="UserName" value="" type="text" data-val-required="The User name field is required." data-val="true">

Note: The MVC client-validation features are built on top of the jQuery Validation library; developer can use the Validation library directly and ignore the MVC features if required. The MVC client-validation features hide the JavaScript, and they have the advantage of taking effect for both client- and server-side validation.

Example:

<script type="text/javascript">
$(document).ready(function ()
{
    $('form').validate({
    errorLabelContainer: '#validtionSummary',
    wrapper: 'li',
    rules: {
        UserName: {
            required: true,
        }
    },
    messages: {
        UserName: "Please enter your user name"
    }
    });
});
</script>


The jQuery Validation library supports some more complex validation rules like email, url, date, number, digits and credit card or we can create new rules.

Creating attributes for client-side validation: To enable client-side validation, we must implement the IClientValidatable in model attribute class. We can create custom validation attributes that work in the same way as the built-in ones and that trigger client- and server-side validation.

The interface defines one method, GetClientValidationRules, which returns an enumeration of
ModelClientValidationRule objects. Each ModelClientValidationRule object describes the client-side validation rule that we want to apply, the error message to display when the rule is broken, and any parameters that the rule needs to operate.

Example:
Example to create a new rule called checkboxmusttrue to ensure that a checkbox is checked.
Developer has to add custom jQuery validation rule to unobtrusive adaptor.

<script type="text/javascript">

    jQuery.validator.unobtrusive.adapters.add("checkboxmusttrue", function (options) {
        if (options.element.tagName.toUpperCase() == "INPUT" &&
options.element.type.toUpperCase() == "CHECKBOX") {
            options.rules["required"] = true;
            if (options.message) {
                options.messages["required"] = options.message;
            }
        }
    });
</script>

public class MustBeTrueAttribute : ValidationAttribute, IClientValidatable
    {
        public override bool IsValid(object value)
        {
            return value is bool && (bool)value;
        }

        public IEnumerable<ModelClientValidationRule> GetClientValidationRules(ModelMetadata metadata, ControllerContext context)
        {
            return new ModelClientValidationRule[] {    new ModelClientValidationRule {
            ValidationType = "checkboxmusttrue",
                    ErrorMessage = this.ErrorMessage
            }};
        }
    }